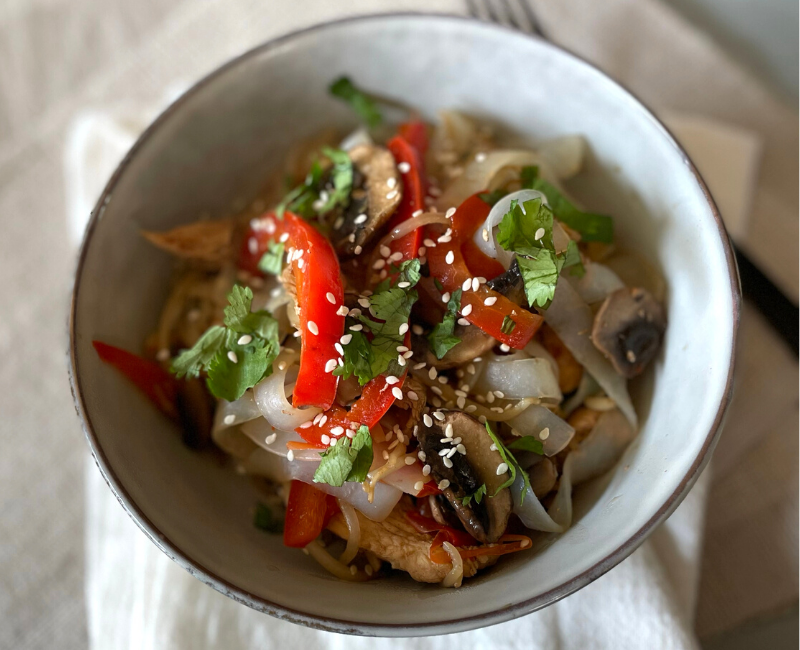

Chicken Lo Mein (low carb/gluten free)
- Yield: 4 1x
Description
This is a delicious, nourishing meal that uses shirataki noodles to keep it low carb and gluten free. These are made from the konjac plant or konjac yam. They are relatively translucent and without flavor, however they take on the flavor of whatever dish they are used for. You can usually find these in the refrigerated produce section of a grocery store. Sometimes you can find them on the shelf in the Asian foods section. You can also find them on Thrive Market Online. Use my “friends” link to save 40% on your first order!
You can easily dial up the heat in this dish with crushed red pepper and extra sriracha. Or keep it milder if you prefer.
Ingredients
Chicken Marinade
· 3 Tbsp coconut aminos
· 2 Tbsp sriracha
· 1 Tbsp toasted sesame oil
· 2 green onions, sliced
· 2 garlic cloves, minced
· 1” piece ginger, minced
· 1 lb boneless, skinless chicken (pasture raised), thinly sliced
Stir-Fry
· 2 Tbsp avocado oil, divided
· 1 lb cremini mushrooms, sliced
· 1 medium red bell pepper, sliced thin
· 1 cup fresh bean sprouts, rinsed and dried
· ¼ cup chicken bone broth
· Four 7oz bags of shirataki noodles, rinsed and drained
· 2 green onions, sliced
· ½ tsp pink Himalayan salt or sea salt (more to taste)
· ½ tsp crushed red pepper flakes *optional
· Cilantro, chopped *optional
· 1 Tbsp toasted sesame seeds
· 1 Tbsp toasted sesame oil
Instructions
Marinade for the Chicken
Add the coconut aminos, sriracha, sesame oil, green onions, garlic, and ginger in a shallow dish with the sliced chicken. Leave it in the refrigerator for no less than one hour or overnight; turning at least once.
Stir-Fry
Heat 1 Tbsp avocado oil in a large skillet over medium heat. Add the marinated chicken and sauté for 5 minutes, until browned. Remove chicken to a plate.
Add the remaining 1 Tbsp avocado oil to the skillet. Add mushrooms, bell pepper and bean sprouts; sauté for 5 minutes.
Add the chicken bone broth and simmer about 5 minutes, until liquid is reduced by about half.
Add shirataki noodles, green onions, salt and crushed red pepper. Stir and cook for a few minutes.
Serve with cilantro, sesame seeds and a drizzle of sesame oil.


Recent Comments